Building A Game World: Sumerative Submission - Year 1 Games Art (Ryan Cudworth)
Building A Game World
By Ryan Cudworth
For this second part of this project we have been given the task to use what we have and are currently being taught to use to help us come up with the design and be able to build are very own 3D model of a building that we'll have to create using the inspiration of a random artist hat have been randomly assigned to us. by looking into and analyze the artist work we will have to use all that we have learned to create a building and 2 street object.
For this formative submissions, Ill have to create several different concept sketches of the type of building Ill be making, along with the the two different street objects along with it. the street items will have to link to the building in some way and also be inspired my the artist. Speaking of which ill have to write a case study about the artist, going into research and looking at what they do and how they express themselves thought their art, which will help me to make my buildings and street items.
Firstly, to start of with my concept creation I had created around 26 different silhouettes of the building. For them I wanted to use the main two shapes that come up within my artist art work. Since that will make it ten time fore easier to come up with a design that he might create for one of his own work. with those shaped being, cubes/cuboids and circles. with these shapes I just went into drawing out as many different silhouettes as I could come up with until I could find one that would spark an idea for the type of building.
After a few minuets of drawing out these silhouettes I had filled two pages of them and had some ideas of how I could them take what I had made and try to transform them into buildings that could match with the artist own work.


Secondly, after I had finished with drawing out the silhouettes I then when onto to trying to make some thumbnail designs of the building. Once again with the designs I made sure to keep in mind the shapes that my artist tend to use a lot. with this I created around 29 different thumbnail designs. I think that with these designs i have got some good and different ideas of buildings that I probable wouldn't have come up with, without doing this to being with. I'll take what I have made here and pick the ones I think look and work the best and do another set of drawings but this time focus on the detail and making them look more like a building.


Here or some different concept sketches of the type of street items I want to be around my building. to start off with, the first item that I new I wanted to have, id a lamp post, since after looking over plenty of my artist work, he likes to use a lot of LEDs and lights within his work so designing a lamp post would fit in so well.
with the designs of the lamps post I tried my best to make them look more interesting then the last and try not to repeat aspects from the others to make sure they all looked more interesting. Though one thing that I had shared within some of the designs was trying to add in some sort of plant theme into the designs. Since my artist work seem to be more about the environment and trying to be more environmentally friendly.
Next, for the second street item I was having a harder time trying to come up with the idea that I could stick. I had tried to go with the idea of making a bin, since they are used to keep waste and rubbish off the environment, but I couldn't come up with a good design for it. after which I thought about those benches with planters connected to, so I made a design for them and then finally thought of a small type of fountain that would serve to house many different types of pond and lake types of plants and creatures. With all that done I decided to go with the bench as my second street item since not only does it befits humans, pants ands animals, it will also be much easyer to fit it in with my build and my first street item, and with that decided I was now able to finish up with my building design.


Thirdly, After I finished with my concert designs for my street items, I have now gone onto Taking the designs that I had created for my from nail designs of the buildings and taking them into more details and really figuring out what kind of building I wanted to create based on the artist that I’ve been given. I wanted each building that I created to be different from the others so that I could generate more ideas and really explore how different I could make each building from each other. From the different buildings that I’ve created I believe that I have managed to do so with me creating a very wide range of different buildings using different shapes and structures adding on additions and all that to create many different ideas. I even made sure to take some inspiration from my artist of the buildings and work to help design how I wanted the different buildings to look. I think I have at least a decent amount of ideas from these final concept sketches of my structures and I think I have some very clear ideas on how I want to take them and create my final building design.

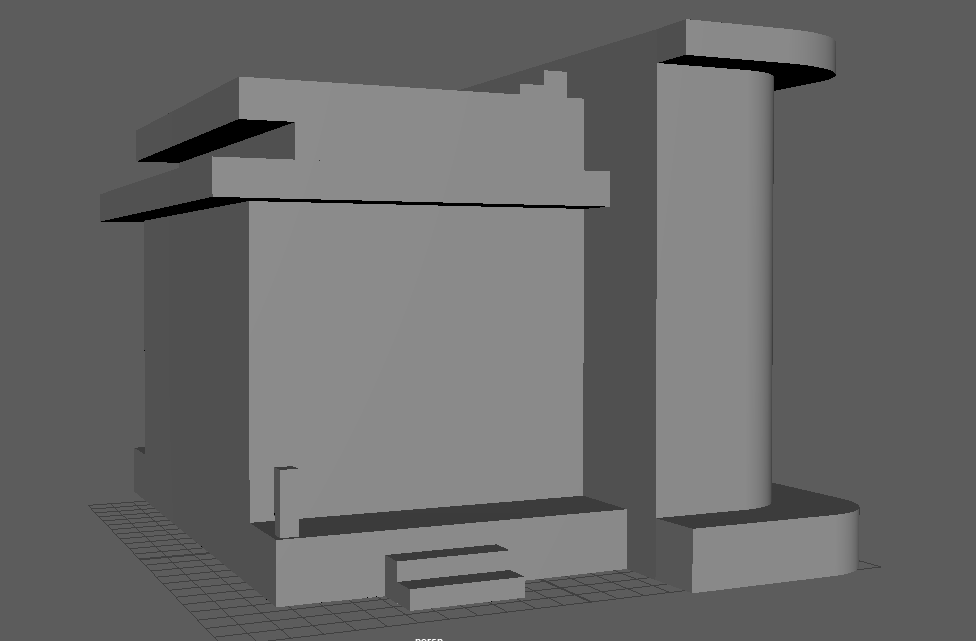
Fourthly, here is my final building design that I have created for this project. This is a very rough draft of what I wanted to look like since I will be taking it into a little bit more detail later on and finite how I wanted to look within an orthographic turn. Book for the most of it I had basis building on one of my artist work which I believe is called the gates Which are a row of block key like structures that are along a road. These structures when at night will illuminate and light the way for the drivers to see where they are going. Taking that as an inspiration, I think that I have created a very interesting and unique design but a design that would work well for a building. As for the role of the building, I was thinking of the sort of structure where different types of pant life, that are kept to allow to grow and observe how they interact with each other. I believe this place would be open to the public so they would be able to see the different types of plants that they have and to learn more about the different types of species of plants that exist within the world.

And finally, Here is the final design of both my structure and the two street items that I have created for this project. I had drawn them out within an over graphic style so that I could properly show how I wanted it to look and feel. And so that I myself can understand how my structures will work when I go to modelling it. For the designs of my structures, I had gone very futuristic modern type of look trying to make it look a bit futuristic but still possible within our day and age. For the building I had to created a very almost clean and serene style trying to make it look like a blank canvas so that when I added it in the plant it would fill up the negative space. As for the plants I had drawn many of them within a very blocky and cube style to help fit in with the style of house that I created but also make it so that it stood out between the other ones that would be a lot more hanging and droopy and more shapely. Another aspect of this building that I had created were the additional details of the lights that are decorated around the walls of the building. These lights would help to illuminate the surroundings around the house and also add in details that would be mainly blank without them.


Next one, my project, I’ll be going into the type of research that I have been doing to help with my process of creating my buildings and structures. By doing this not only will I be able to portray to those reading how I’ve been able to get to my ideas and style That I have used to help create my structures, but I’ll also be able to help myself with being able to come up with the ideas and really think about how it would fit into a normal setting And interact with other buildings around it.
My first bed of research, I will be going into and looking at different ways to expand and explore world building and lore. Like I did with previous projects before I’ll be looking into how to properly conduct and write world building and lore for my own pieces of work and how I can use it to help me crate and come up with ideas for my designs.
Firstly, I’ll be talking about how to probably conduct and create different types of world building for creating not only a structures But to also incorporate those structures within a world. The reason why creating world building and law is important when doing project like this is so that it is more easier to understand what type of building that you’re trying to create and understand its purpose within its environment. By knowing this it makes it much more easier to design and create your structures since you’ll know what their purpose is and the best way in which that would translate into a design.
To start off with when doing well building it is best to start off with thinking of who, what, where, when, why and how. By asking myself these questions I am able to very easily get down what I want my building and street items to be and their purpose within the location they are at. Is best to do this when You have a solid idea of everything else you want your building to be so that you can properly understand what you are trying to create. If not then you could end up having too many ideas jumble up contradicting yourself and just creating a mess of everything when this is supposed to be a very streamlined and easy process. The reasons why you should do this is that it will make everything much more easier for you to do your work and get everything done in a timely manner which is the aim when doing the project.
But if this is not how you want to be able to crate and make well building, you can try out of a methods like writing down lists of things that you want Your structure to be and the uses and responsibilities that the building has within it. Also, anything else that you can think of that you might like to have listed down. By doing this this gives you a visual image of your thoughts and ideas so that you can then properly assign and organise them into a proper and well built world that your building is able to exist within. You don’t have to write it down a list there are other ways that you can drop down your ideas like creating mood boards mind maps and such more. Any type of way where you get your ideas down on a physical or at least digital plane and be able to see and understand your ideas and organise it is a great way to help with world building and creating any kind of lore within it.
Another way in which you can help with your process of creating world building is to get feedback from other people. By telling other people your ideas they can then respond and don’t give criticisms to your ideas and help you create a more streamlined and easier thing to understand since while an idea may make sense to you since you created it it may not be the same to other people and getting their input will greatly improve your own work.


Here is the steps that I have taken to create the final design for my building inspired offered an artist. When designing the final design for this I really looked over. There were designs that had gone through and really thought how I wanted it to look and see if I could add or change anything of the design and then try to implement it as best as I could within this final design. For all of the drawings that I had done, I used the drawing program there in a sketchpad which has a wide variety of tools that I had used to create this final design and all the other drawings throughout this project.
When starting off creating design, I created a basic sketch of how I wanted the layout of the structure to look. Taking what I had designed before and the ideas that I wanted to try and incorporate into it, I tried my best to create a sketch that met thought that I had for the design for this building. Since this was only just a sketch, I kept it very loose and scribble so that When it came time to do the lineup for it, you’re being much more easier to kind of see where I was going with the lines and which one would work best for the shapes that I was going for. And after I had finished with my sketch for the structure, I have now gone onto the line art.
When doing the liner, I hadn’t decided to use the square tool to help get the real box shapes for the building. Which not only made it much more easier to do And it also made it a lot less time consuming, which meant that I could spend more time later on other things that were more important. There’s not really much I can say about the liner. It was pretty easy and I mainly just tried to keep it as close to the sketch that I had drawn out. I think that because I’d use the square tool to create the shapes, it looks more blocky than I would’ve really thought it would have turned out to be. It’s not that big of a deal, but I think that maybe if I tried to do it again, I would try and reframe From using the square tool to make it look a little bit more alive and like it actually been drawn by me.
And finally for the last part of my final design, I had gone into iron in all of the colours that would be within this structure. When starting off I had decided to select colours from my previous drawings of this structure to make sure that I didn’t spray too far from my original colour feeding for it, But I had also decided to add in another colour that I had put into a previous piece that wasn’t a part of the structure itself but a part of the structures around it. With me now adding in a new colour to the structure with it being a type of light brown that would help give off a type of wood feel. I decided to add this colour onto the side round bit of the structure since I thought that the plain white wall for all of the main building would be pretty boring to look at and the little splash of colour would help make it look more alive and less blank.
In conclusion I think that this final design has a lot of good qualities to it but also some bad qualities that I would have to make sure I don’t fall back into work for any of a project that requires designing something similar to it. But overall, I think that for the design that I was going for I think it fits very well and in what I had envisioned for it and not only that but I think that it’s not too complicated or over designed which Is a good thing since I would have to now go onto modelling my design into a 3-D model.
Here is where I created some mood boards and mind maps for my research for this project. The reason why I had created these is so that I can explore and expand on my ideas that I have for this project. By doing this, I am able to look at what I have for and put it down so that I can then look at it see images next to it and any other ideas that I can put with it and be able to kind of see it all laid out for me so I can properly pinpoint where I want to go with this project. This is a very important stage when doing any sort of work since this will really show off your thoughts and what you’re trying to create for whatever you’re doing. For these mood, boys and mind maps I had used a program known as Milanote. This program is very useful and handy program to use when doing projects like this and wanted to create mood boards and mind maps. It has a wide range of different tools and setting so that you’ll be able to properly use and layout the different types of things you want to use for any type of product that is going on.


Hey, I have created a small move board of some of the types of buildings that I was inspired for for the creation of my own building design. I wanted my building to be a type of futuristic modern house that is just covered with plant life. From looking at these building designs, I see that the main shape of many of them is that of a cube, Which not only helped to fill out space but also allow for a lot of room to add detail. Also, I’m looking at these images. I have been able to see different ways to incorporate life into the design of the building I ever have it literally growing on the walls or just to have it around the building grow growing separately. I’ll be taking what I have found and looked at into my designing process.
___________________________________________________________________________________
3D Model
For this project I have to not only do I have to create and design concepts and sketches for a building and street items based off of the artist that had been given to me, but I also have to turn and texture the building and street item into a full 3D Model, using the 3D software known as Maya that I have been using and learning thought this project.
When starting off with my modelling, I’d use the basic cube shape which I then built out from extruding and using the Arrow tools to help create the shape of the basic layout of my building.

I’d also made sure that while we’re working on this project, I made sure to look at it from different angles and so that I could only get the dimensions right but also make sure that is close as the design that I wanted to be here.


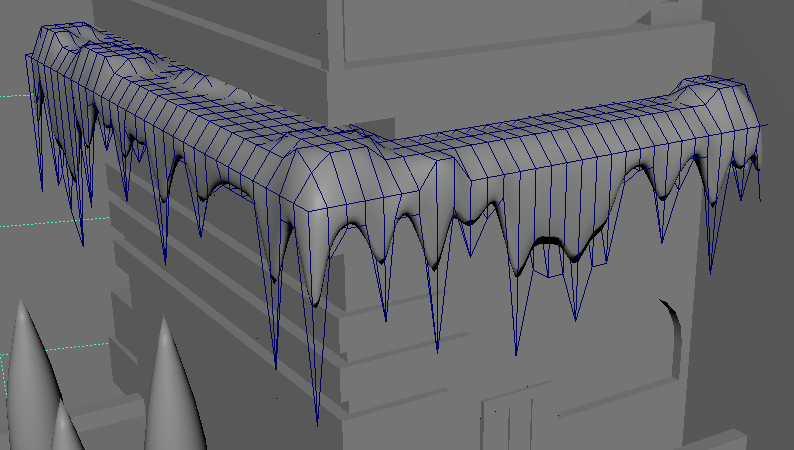
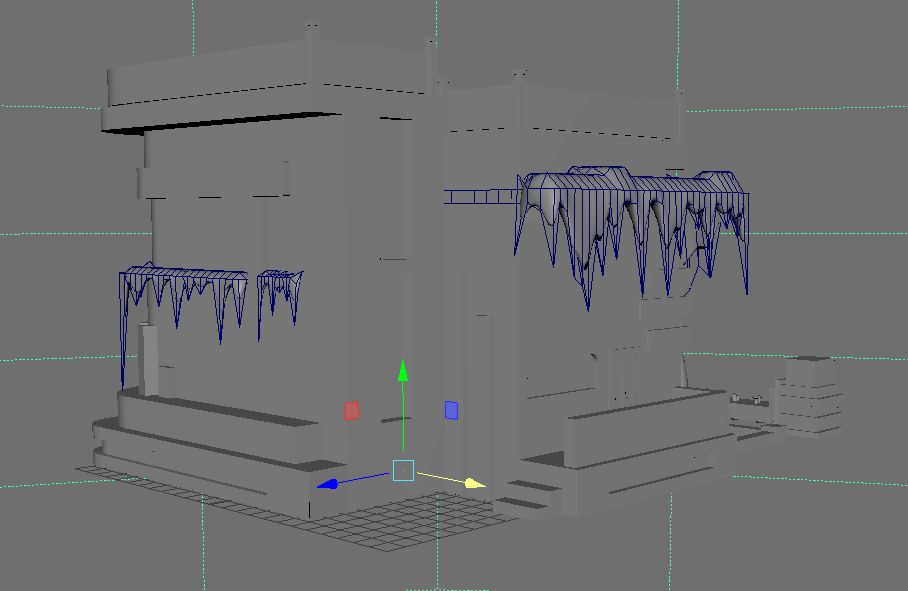
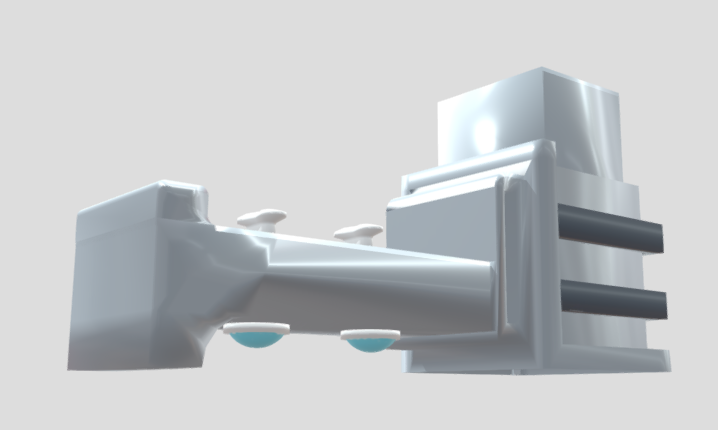
After I do it create to the basic shape of the building I had then decided to go ahead and add in detail to my model creating the light bits that would be on the side and the grass walls that would be on the porches of the building.


Throughout migration of my model, I had tried out some different ways of designing the Plants on the side planters of the house. Well, my first attempt wasn’t bad, but it was still not the right shape that I was envisioning for it with me having tried to take just a circle and trying to stretch it out, Sorry for my second go round I decided to use the cone shaper instead and move around axe is it to help get it into the shape that I wanted for it, Which I believe it turned out much better than my first attempt at making them.


Further down the line I had created most of the extra details for the building and even added in the indent for the windows of the building. And I had even added in the doors for the building and using a separate cube and extruding it into the shape that I wanted it to be. There was still some parts of it that I were finding difficult to create, With the main bits being the glass railings on the top of the building, I was finding it hard to connect two parts of it together in the way that I had envisioned it to be. But after some time and then getting some feedback from other people I’d asked what I should do about it. They gave me the idea to for the slanted part of the railing to one bridge it to another point on top to try and get the shape that I wanted which did work well and for the current part of the railing would be to also bridge to separate parts together then using control to curve the part that I connected together to help create the shape that I wanted, and even adjusting it a little bit when it wasn’t exactly the shape that I wanted it to look like.

After I finish with the designing of my building, I next gone onto creating the street items. Starting off with the lamp since it had the most simplest shape within its design. Like with my building, I started off with a cube and extruded out to get at least a base shapes of the design. I also use the control B to get the curve shape burnt that I wanted for the extra bit that comes off of the main base of the lamp. For the cylinder thing I had gotten a cylinder and cut it in half Since there would be no need for that other half since it would just be inside of the model. I also did the same for the top and Bottom half of the cylinder since one would be covered on the top and the oven would be in the model so there’s no need for them to exist. And then finally, I had taken a spare and cut it in half both vertically and horizontally so that I would get the fitting shape for my lamp. It took awhile to get the design to work out since there were quite some difficult and intricate details within it, but after a lot of hard work I had managed to complete this model.


And then, finally for my street items, I had finished off with creating the bench for my building. Once again, taking normal queue, but an extruding outwards was my main way of creating the full shape for my model. And like with my other models, I would also use to control B to help create the curved bits within the design. For the extra details like the little dome lamps at the bottom I had simply taken both cylinder and circle cut the circle in half and squished it down to get it looking more like the shape that envision for the lamps and then sized them down and put them together to make it look like They were actually lights that were put underneath the bench.

After I had to created the models for the street items, I hadn’t decided to try and find a way to fit them in naturally within the design of my building. I placed the lamp and duplicated it in front of the main entrance so that it looks like a type of path light that would help people see where to go and what not. And as for the ventures, I had decided to once again duplicate them and have it look like their seating So that people can sit down and look at the plants within the little planter. As a nice type of seating that would work well and makes sense for this building.

Now what is the part of my model making where I had finished with actually creating the models for my building and street items, I can now go onto UV mapping out them so that I can then transfer it into creating the textures for my structures.
I would like to say that I think UV unwrapping is probably my worst area of expertise when modelling and texturing since I just find it difficult to try and find the shape of how to break it down so that it would work unfolded and sometimes I come across an issue that I just don’t know how to do one or deal with. I probably would’ve succeeded much more if I had done more often asked for help from others when trying to do this part of this project.


To start off with with my UV mapping, I had decided to start with the main building, Since not only is it the largest model that had created. But it would also be the most difficult and time-consuming to use the unwrapping so we’re getting it over with to start with would be much more easier and save me a lot more time and headache.
When UV unwrapping the main building I hadn’t started off with the small detail bits using the cooked tool to break them down into much more flatter and simpler shapes and then unfolding them so that they would become flat and easier for me to then texture later on. As for the main bulk of the building, I had to use the cut tool to separate the main parts of structure so that it would be much more easier to unfold, Since if I were to try and do it with it all being one big combine in shape, it would be really difficult and maybe even impossible to try and do. So after I had to cut out the different parts and laid them out, I had then gone onto individually trying to figure out how to win cut the right part so that it would unfold in a way that would look clean and nice, so that would be much more easier to texture. Some parts were much more difficult than others mainly the bits that were more rounder. They were a lot more difficult and there were sometimes that I would come across lines that would already be cooked and I couldn’t change back which would make it a lot more difficult to actually breakdown and unfold with many of them I have to cut them up into even smaller parts just so I could get it to work.
But by the end of me, UV unwrapping it all I think it came out as best as I could manage with the limited knowledge and experience that I have with UVV and wrapping. And then I can now go onto UV and wrapping the bench and the lamp, which will hopefully be much more easier to accomplish.


Unlike what I had thought to this part of UV and wrapping was a lot more difficult than the building was sadly. For some reason I was able to break down some of the more simpler shapes, But when it came to try and get the main bulk of these structures, it became a lot more difficult and I just couldn’t find the proper way to actually separate and unfold them unfortunately. I tried some different ways of doing it, but None of them really got me anywhere where I wanted to be and we have time running it out for this project. I hadn’t decided to just leave the parts that I couldn’t do as they are since I couldn’t figure out how to cut and unfold it in a way that would look good. But by doing this, this had then made it much more difficult for me to then texture these models when going into substance painter.


Unlike with how I had modelled and UV unwrapped, I decided to start off with my lamp as the first thing that I texted since it was the smallest thing I had created and had a much more simplistic design with very little details in it. Overall, how I would describe my time text it was quite difficult and very stressful. I think, if I had spent a little bit more time on my UV and wrapping, I could’ve made it much more easier for me, Since whenever I had tried to colour in parts of the model it would do for some reason also colour a different part which did not work out at all. Overall, this texturing came out quite sloppy and it wasn’t even the right material for some of the pieces with the blue bit supposed to be kind of like glass but I couldn’t figure out or find a way to do that and as I said I was slowly running out of time for the hand in for this project.
And finally for texturing the model I had decided to add in some small little extra details to help make it look more realistic and like what I had envisioned it to be. This is mainly seen within the little cube plant bit on the top I had to use different shades of green to help me yet make it more convincing that it is actually a plant on top of this structure. And another thing that I had decided to add a little bit more detail into was the little blue bits that was supposed to be LEDs I added some different shades of the same blue and tried my best to make it look like it was given off some sort of glow or that it was at least something that was glass material.

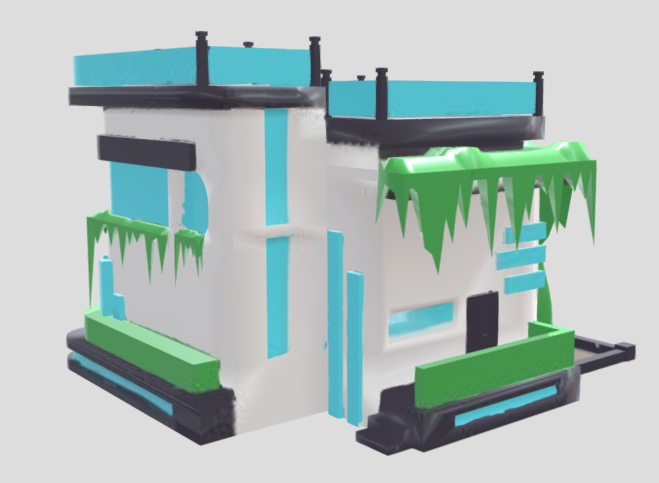
After completing the textures for the lamp, I had next gone onto tackling my main building. This was a lot more difficult than the lap with not only size isn’t being the main factor for this but also all the amount of details and small little gaps and crevices that I had created made it really hard to text it without accidentally going onto another part of the building that shouldn’t be the colour that I’m trying to make it. Not only that, but for some reason both the steps for the front entrance and on top of the building just wouldn’t be textured but for some reason they would gain colour whenever I painted on a different part of the building. I didn’t really know why that was happening. I think maybe I’d messed up somewhere within my UV unwrapping but I was too far along to backtrack and try and fix it since I had so little time.
Thinking back on texture in it it wasn’t too bad. It was just a lot of finicky details that whenever I would accidentally messed up it would just create a lot of mess that I would then have to go back over and it seemed that whenever I fought I had cleaned something up something else would be then messed up which just really Messed with me and really made me lose my cool a few times, But even with that, I had powered through and tried my best to make it look as good as I could possibly make it. Unlike what I did with lamp I didn’t add in any like small little details like shadows and little on the parts glass since I’d already spent a lot of time just adding in the basic colours for this model and trying to do all that and how stressed out I was already was I decided that it looked fine just with a basic colour since you could see basically what it was supposed to look like. But with maybe a little bit more time and patience, I might have been able to fully add in the detail that I wanted to, Especially for all the plant life to help it look more like plant than just something that’s been painted green.
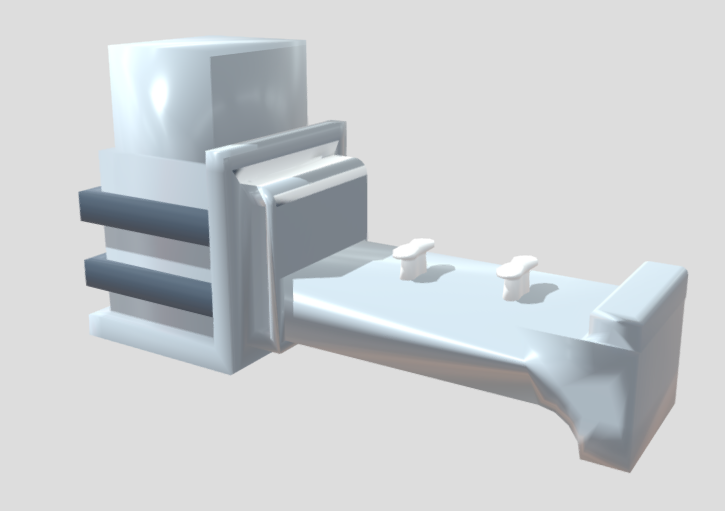
And finally for my textures, this was probably my most disappointing and unfortunate texture I had done so far. I tried to text you this thing two times with the first one for some reason it looked like there were other faces on top of it which made it all glitch out whenever I moved or looked at it which didn’t really work out so I had to then go back into Myer and try and fix it. But sadly, by doing that, I had created a different issue for myself, Since when I had gone back into substance painter to then texture it, I could only texture certain parts of this model with the other bits being unable to be textured aside from the base colour. The only bit that I was able to actually add some colour onto the lamps underneath the bench bit the little hand rests in the centre of that and the two bars on the side of the planter. Everything else I was not able to texture and I didn’t have enough time to try and figure out what was going on with it.
After I didn’t try my best to do it, I just felt really defeated over all and I could only really you just put them in as they were to try and save on the time that I was already losing by stressing over it.
And finally get the last bit for my modelling and texturing I had to finally add in everything into sketch Fab so that it would be able to be seen and saved somewhere that anyone could really look at it and analyse. To do this, I went onto Files and gone all the way down to export textures, which then allowed me to then select the file that I wanted to send and then pick where I want to send it to which I had then selected to sketch Fab, With them pressing the bottom right export button which then brought up another small window that would allow me to then name my model and then add a description to it, And after doing so I was then able to fully put it into my sketch trap account being able to publish it so that it can be seen.

Comments
Post a Comment