Industry Collab - Production
By Ryan Cudworth
For this project, we have been tasked to take the work that we have done within the Pre-production projector And use it to your key art And 3-D models of the characters and assets that we had created within the idea generation within the last project. Also for this project will have to be going into some studies into different types of artists and production workers within the creative community and to see how their roles affect of a roles within the pipeline of a project, And for final things we will need to complete within this project is to do a bit of studying about different art And the art style within the K 47 universe and to also look at our values within our work to make sure that our project comes across clear and easy to read.
Thumbnails - Here is where I’m going to be creating some thumbnail sketches for this industry Collab project. For this, I’ll be creating several smaller and quick sketches of scenes in which both of my characters would be within. I’ll be trying out to different poses and ideas with each one on my sketches and trying to figure out what I want my key art to be at the end of this project.
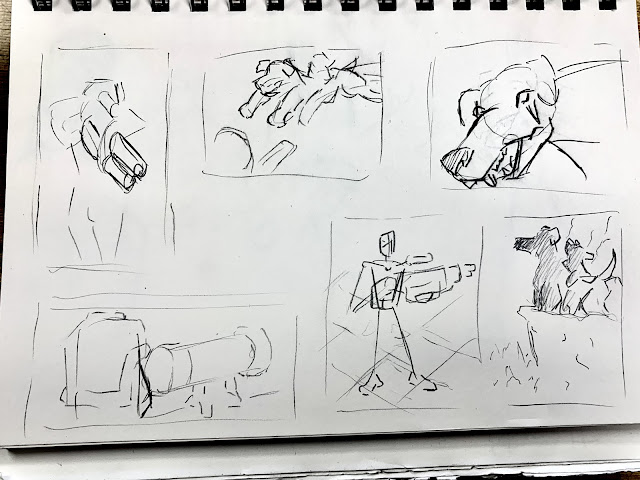 |
| Here is my first few thumbnail sketches that I had created for this project, These were just some rough ideas that I had created with not many of them being used as I am from the bottom right one which I take on further on down the line within this project. It’s because I will like this dance that it was for my dog character and the atmosphere that I gave off. |
 |
| Here I had decided to focus on my warrior character since he would be the main guy and created some more fun sketches and some posing for the different sketches. They are done to try and get down how I wanted them to look within the key art. I’d also made a sketch on the top right corner, which I will be taking further the line to my final piece, Since I like the concept of my character being surrounded by chaos looking back towards the viewer showing that even within such a chaotic environment, he is still vigilant and aware of his surroundings. |

Value Composition - Here is were I've started with doing some value composition, were I've blocked in some basic shaped of my characters and their surroundings and then lowered the hue of the them to see which works the best and what colours would work better together within the composition of the piece. And I'll also be trying to figure out the overall layout and build I want for my final key art, taking my thumbnail sketches and trying to make something more thought out and readable.
 |
| Here I had taken one of my very loose from the sketches of my main warrior character and did a little bit of alteration on the colours and saturations of the rough pieces and try to see which one works best within a more desaturated version of itself seeing which colours works best together so that I can create a much more coherent final artwork. |
 |
| Like I had done before and taken one of my loose pieces of work that I had done and changed up the colours and saturation of them until I created some different versions of the same piece of work and then desaturated the hues So that I can see which colours work best together with a much more monotone setting, Which will hopefully help me later on down the line when I’m doing my final piece of work for this project. |
Mood Boards - here I had just created a few different Mood boards for my two key artwork so that I can get a better understanding and clearer idea of how I wanted to look and the different kind of poses and environment that I want them to be in. I’d also created two more mood boards for the type of texture work that I wanted to use for my 3-D models for the items, So that when I had finally got into adding in the textures for my 3-D items, I’ll be able to much more easily understand what kind of route I’m going for for them and don’t be able to much quickly finish up the texture work for these models.
Orthographic Turn - Here is we’re I’ll be doing an Orthographic for both of my two characters items that I’ll be turning into a 3-D item. By doing this, it will make it much more easier for me to visualise and understand how a free model would work with the item that I had created and will save a lot more time within the creating process when doing 3-D.
3D Items - within this section of my project, I will be creating two different 3-D models of two items that had designed previously within the last project for both of my characters that I had also created within the project. For this section, I will be not only creating the 3-D model for these items, but I’ll also be texturing and rendering them to the best of my abilities and trying to create a realistic model that could be used within a tabletop game.
For the items that I had decided to go with for this section of this project, I decided for My soldier character that I would try to create their weapon that I had given them, Since I think that it was the main aspect of the character and it would be sort of a challenge to do and I think I want to try and challenge myself with these models to try and force myself to do better with 3D. And for my second character, The War hound I had decided to go with the helmet on the main dog's head since I believe that the shape and the fact that I need to incorporate the hole for the ears would be a very interesting and challenging model to create.

 |
| Here I had created some basic 3-D model of my weapon using some basic cylinders and cubes to create the basic shape in which I could then work off on later on down the line within the creating these 3-D items" |
 |
| Here is where I Had been shown some different ways in which I could create the barrel of my garden and be able to get the same type of shape that I had created for the design of the weapon. |
 |
| Here is my final Fully modelled weapon, for my warrior characters gun |
 |
| Here is where I had UV unwrapped all of the different pieces of the weapon so that I could then take my work into substance painter so that I could finally texture them all. |
 |
| Before I had decided to go into something painted to texture my piece of work I had decided to try and text right within Maya using it the texturing and rendering software within it. This was very basic kind of texturing with me just trying to figure out how I wanted it to look like it before I took it into substance painter. |
When I had taken it into something painter, I had found out that on the barrel there was a slight issue with one of the pieces so I had to Go back into Myer and fix it by adding in a simple word line between two Are the vertexes that I had somehow managed to separate.
 |
| Here is the final workpiece of fully rendered 3-D model of my warrior characters weaponry. I tried my best to get it as close as I could towards my concept work for the weapon and try to create a glowing kind of illusion with the red glass since that is supposed to be well all the energy and power is kept and shot out of. |


Key Artwork
Here are my final key artwork for this project of both of my characters that I’ve created previously within the Reproduction project.
To be honest these piece of of work were very last-minute kind of work since mainly my 3-D work took a lot more of my time and effort since I had very little software use of Maya and substance painter for me to be able to use within the time limit that I had for this project. But I’d still try very high within these pieces of the work to try and create a coherent and interesting looking key artwork that help to show off the type of characters that I created.
When creating these key artworks I had used an art program known as Sketchbook using the tools and special settings with it to create a piece of the work that I had produced for this project and for other projects before. I didn’t for the background of these pieces of work used The tall known as the lasso tool to help create simple blackouts of the environment and then using different to saturations of the colours to create lights and shadows. And for the final piece of details to help make it look more painfully I’d use an actual paintbrush tool on the program to help blend in lines of the highlights and shadows to help make it look more realistic in a type of way. For the actual characters that I created, I wasn’t able to do the same that I did for the background environment since they had a lot more details to them and when I tried to just paint them in it didn’t come out all that clean so I used them limited line work to help create the characters. Which I think all things considered helps make the characters pop out more, especially my dog character since it’s in a lot more darker environment, the lines around it helped to make it much more visible and stand out more.


Reflective Statement
Now finally for this project, I’ll be doing a reflective statement on all the work that I have done and try to explain not only the process that I’ve done but also the things that turned out well within this project and the things that didn’t really turn out as well and tried to explain not only why they turn out the ways they are, but also Try to find ways in which I can not do the same later on within later projects. And to finish off, I’ll be ending it by kind of explaining how I will try to incorporate these positive and negative points from this project into later projects down the line so that I try not to make the same mistakes and try to be as productive that I was within this project.
Starting off with, I’ll be explaining the things in which that I found that went well within this project and why I believe that it is so. The first thing that I think went pretty well within this project is my first ideas for my work. I had not only a clear understanding of the items in which I wanted to really model and how I was going to do it but I had also had a good understanding of the type of key artwork that I wanted to create being able to fully utilise my nail sketchers to help get down my ideas but to also use my value composition to help further out my ideas and the way that I would be here colouring and composing my key art. This is very important for when working within a project since having a good understanding of my ideas it will help make sure that I don’t fall behind within the project and that I understand the direction that I’ll be going in there for it. Another thing that I believe I did really well within this project is my understanding on the importance in which thing I needed to get complete, while working within this project I had come to the conclusion that my free work needed to be completed since I didn’t have a suitable software system that would be able to run the programs that would be needed to create these 3-D models but also these 3-D models are not only needed creating them, but texturing them would take a lot longer than it would with anything else to do within this project so making sure that I get them done first was very important And my understanding of that I think is one of the main reasons why I was able to complete this project on time. This type of understanding on the importance of what needs to be done first I believe is very important for any project that I’ll be doing since understanding it will not only help me save time later on down the line but it will also mean that I’m able to deal with the hardest stuff first and leave the much more easier work Later on down the line, They’re saying that because of the fact that I prioritise my modelling over my artwork that kind of suffered a bit with my key artwork not really being of that higher of a standard but still overall I think those pieces of work came out as good as I could with the situation that I was in.
Now I’ll be going onto the part of this project that I don’t think really turned out as well. To start off with the writing proportions of this project I think suffered a bit with my main focus being on my 3-D models and artwork. Those kind of bits were left off to the side And did didn’t really get much focus from me which I think if I had focused them within the more later stages of this project might affected the outcome later on and could’ve been a much more positive outcome for this project, Though since I can’t really tell whether that would be the case, I would just say that for later on project I’ll try to pay a lot more attention to my writing and research and try to just work alongside it with the other parts of any project I’m working on. For the next thing that I don’t think I did really well with it in this project is my management of my work since I tried to stick into it at the start but later on down the line I had to compromise and change what I need to work on and I didn’t really manage it all that well And I think that if I had paid a bit more attention with the management section of this project and tried to better manage my work I might’ve been able to find a compromise for the issues that I was having and be able to work on it much more efficiently. So for any other further projects that I may be a part of, I’ll definitely try to pay a lot more attention to my management and try to make sure that if any changes that need to be made I make them and try to find a workaround for them. And finally, for the last thing that I don’t think I did really well on this project is an annotations and trying to make notes. While it may seem like such a small part of a project, I didn’t really incorporate all that much, especially with my thumbnails with none of my sketchers having really any annotations to them or any type of note taking at all. I have tried to rectify that issue by kind of writing some annotations around the images that have taken of my thumbnails. I think that if I wanted to make it much more easier for myself that when doing good stuff like thumbnails and sketches for projects I should try to add in more Annotations for my work so it’ll just be much more easier to handle and understand the ideas that we’re going through my head at the time?
Overall I think for this project it was a very kind of neutral kind of work much better than that I had done for any of my other projects I’ve done this term but still a few ups and downs here and there and work that I need to try To make sure that I get down and try not to repeat within further projects. I’ll definitely for other projects. Try to manage my time more efficiently and my workload, so that I’ll be able to much more efficiently at work On the task that are given to me on any projects further and down the line. I’ll also make sure that I try not to let any of a task fall behind while focusing on another one I’ll try to better manage that. But I worked with this project was a lot better than some of my past ones. And I think that I had managed it a lot better And I had it with other projects and been a lot more aware of the task at hand.


.png)


Comments
Post a Comment